AWS Diagram Generation in CI/CD Pipelines with Cloudviz API

by Valts Ausmanis · October 24, 2023
In today's fast-paced DevOps environment, automating crucial tasks is the key to efficiency. When it comes to AWS infrastructure documentation, keeping diagrams up-to-date can be a challenging manual process. Enter Cloudviz.io API – that simplifies AWS diagram generation. This article will walk you through three CI/CD use-cases, enabling you to effortlessly update Confluence diagrams, visually compare diagrams before and after deployment by sending to Slack channels, and track AWS configuration alterations with ease.
What is Cloudviz API?
The Cloudviz.io API provides an easy way to generate live diagrams (SVG, PNG, PDF or Draw.io / Diagrams.net.) or complete JSON snapshot of your AWS account with one API request.
Here are few options to kick start your Cloudviz API usage:
Cloudviz API Usage In CI/CD Workflows
We will now explore how to best use the capabilities of the Cloudviz.io API within your CI/CD pipelines to streamline your AWS diagram generation process. We'll delve into three key use-cases, each designed to enhance your workflow:
- Keep Diagrams Up-To-Date in Confluence
- Send Diagrams to Slack Channels
- Snapshot Comparison for Deployment Changes
Keep Diagrams Up-To-Date in Confluence
Automatically updating AWS diagrams in Confluence after a CI/CD deployment process offers several distinct advantages. First and foremost, it ensures that your documentation remains accurate and reflects the current state of your AWS infrastructure. This accuracy minimizes the risk of misconfiguration or outdated information, which can lead to operational errors and security vulnerabilities.
Moreover, automatic updates save valuable time and effort, eliminating the need for manual diagram revisions. This time-saving aspect is particularly crucial in fast-paced DevOps environments where changes occur frequently. It also enhances collaboration by providing teams with real-time, up-to-date information, facilitating informed decision-making and troubleshooting.
Update Confluence
Before we can start to update diagrams in Confluence, we have to create the Confluence page and add an initial image that we will then update from CI/CD pipeline. After we have created the page added the image, we have to retrieve the ID's from Confluence:
- Content ID (= page ID)
- Attachment ID (= image ID). To get ID (in the specific page) click Attachments -> Files -> View (for specific attachment) and check the link URL ex
&preview=/CONTENT_ID/ATTACHMENT_ID/...
We also have to crete Confluence API Token to authenticate the API requests in the CI/CD pipeline. We will use "Update attachment data" API endpoint to update the diagram image in Confluence (Confluence Cloud REST APIs overview )
Update CI/CD Workflow
In this example we will use GitHub Actions as our CI/CD platform. But it's easy to re-use this setup in any CI/CD tool out here.
First we have to add following secrets to the GitHub repository:
CLOUDVIZ_API_KEY- Cloudviz API key in order to authenticate diagram generation requestsCONFLUENCE_USER_NAME- Confluence user name - the one who created API tokenCONFLUENCE_API_TOKEN- API token that is used together with user name to authenticate Confluence diagram update requests
Next we have to update our existing deployment workflow with two additional steps (after deployment step):
- Generate live AWS diagram using Cloudviz API "Snapshot AWS Account" endpoint
- Update Confluence diagram with newly generated one
name: Sample Deployment
on:
  pull_request:
    branches: [main]
    types:
      - "closed"

jobs:
  deployment:
    if: github.event.pull_request.merged == true
    runs-on: ubuntu-latest
    steps:
      - uses: actions/checkout@v3
        with:
          ref: ${{ github.sha }}
      - uses: actions/setup-node@v3
        with:
          node-version: "18"

      - name: Build & Deployment Steps
        run: echo "Build & Deployment Steps ...."

      # First step is to generate AWS diagram using Cloudviz API and save it as SVG file
      - name: Generate Live AWS Diagram
        env:
          AWS_REGION: 'eu-west-1'
          CLOUDVIZ_AWS_ACCOUNT_ID: '9f910f00-5c5a-11ee-b12d-57664c9998b0'
          OUTPUT_FILE: 'live-diagram.svg'
        run: |
          curl 'https://api.cloudviz.io/aws/accounts/${{ env.CLOUDVIZ_AWS_ACCOUNT_ID }}/${{ env.AWS_REGION }}/svg' \
          -H 'x-api-key: ${{ secrets.CLOUDVIZ_API_KEY}}' \
          -o ${{ env.OUTPUT_FILE }}

      # Last step is to update Confluence diagram using Confluence Cloud API
      - name: Update Confluence Diagram
        env:
          CONFLUENCE_CONTENT_ID: 65936
          CONFLUENCE_ATTACHMENT_ID: 491526
          CONFLUENCE_URL: 'https://cloudviz.atlassian.net'
          OUTPUT_FILE: 'live-diagram.svg'
        run: |
          curl -D- \
            -u ${{ secrets.CONFLUENCE_USER_NAME}}:${{ secrets.CONFLUENCE_API_TOKEN}} \
            -H 'X-Atlassian-Token: nocheck' \
            -F 'file=@${{ env.OUTPUT_FILE }}' \
            -X POST '${{ env.CONFLUENCE_URL }}/wiki/rest/api/content/${{ env.CONFLUENCE_CONTENT_ID }}/child/attachment/${{ env.CONFLUENCE_ATTACHMENT_ID }}/data'
Verify Updated CI/CD Workflow
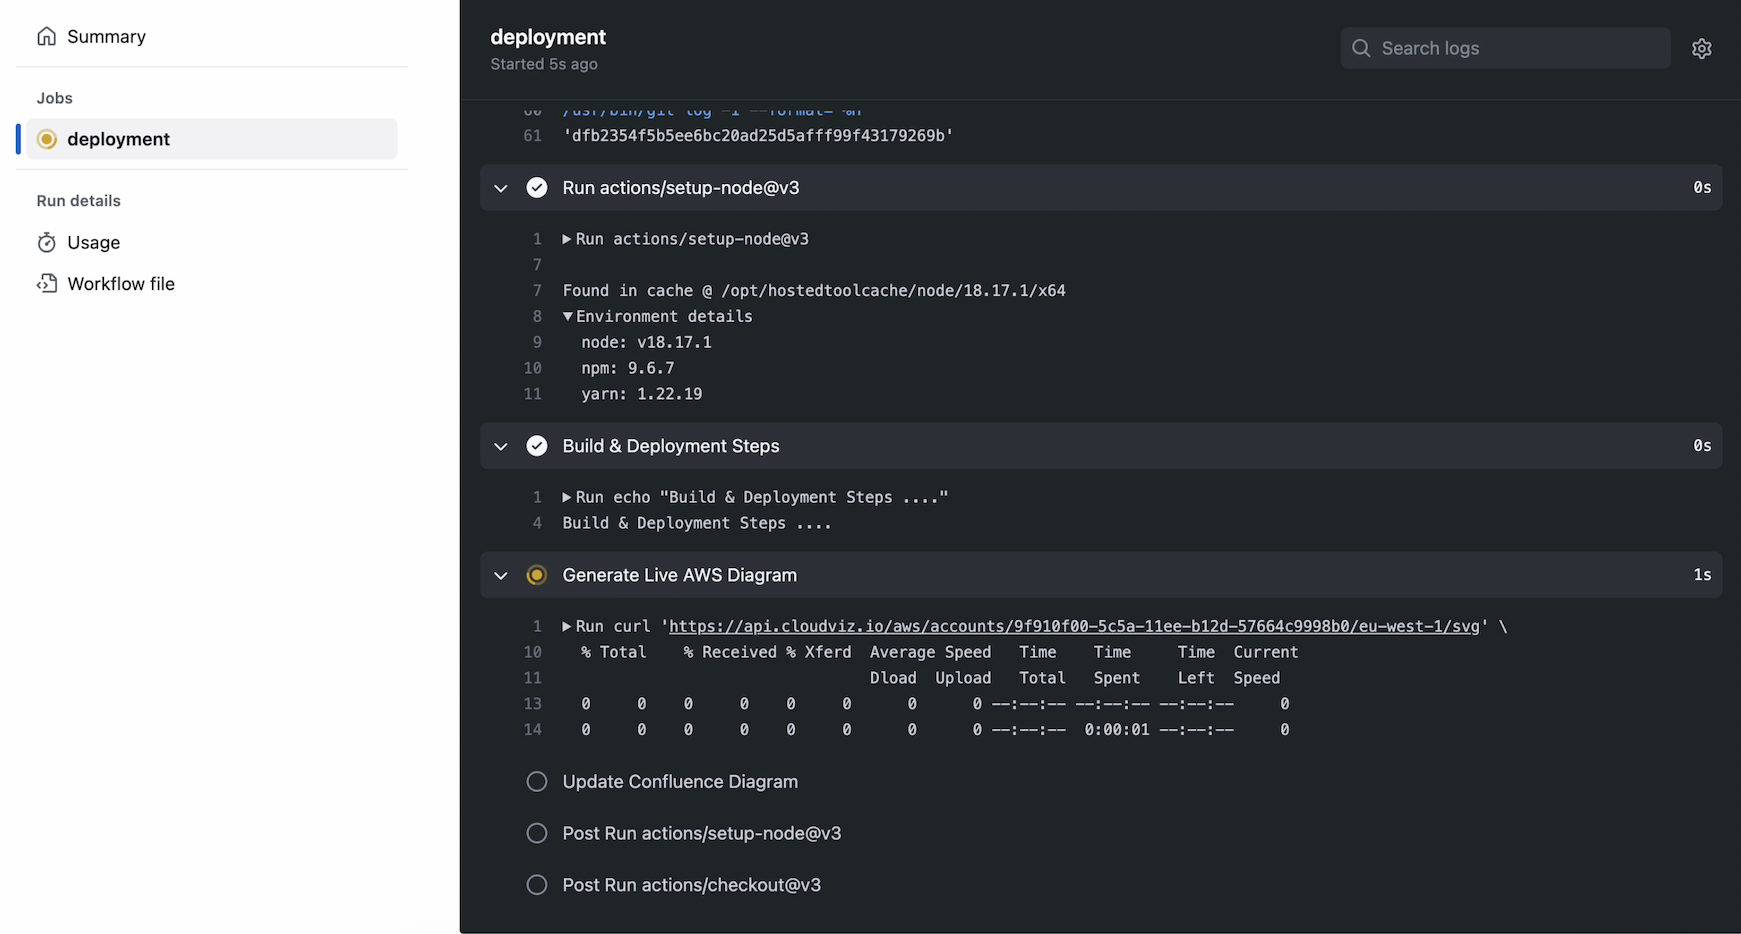
Now let's run the deployment workflow and verify if the diagram was successfully generated and updated in Confluence.
Send Diagrams to Slack Channels
By visually comparing AWS diagrams before and after the deployment allows you to easily assess the impact of changes made during the deployment process. By effortlessly sharing these comparisons with your teams through platforms like Slack or Teams channels, you ensure that all stakeholders are well-informed about the modifications made to your AWS infrastructure. This transparency enhances collaboration, streamlines troubleshooting, and fosters a deeper understanding of the deployment's effects.
Furthermore, the ability to archive these diagrams (additionally with full AWS account JSON snapshots) for version history is invaluable. By committing them to Git repositories or pushing them to an S3 bucket, you create a comprehensive record of your infrastructure's evolution. This not only aids in tracking changes but also provides an essential audit trail for compliance and regulatory purposes.
Update Slack
We will use Slack channel where the generated diagrams after CI/CD deployment step will be pushed. We have to create one if it doesn't exist already. Then we have to create Slack app and copy newly created API token (in app settings OAuth & Permissions -> OAuth Tokens for Your Workspace) in order to authenticate API requests.
Once we have the Slack channel and app we have to find the channel ID (click on the channel and check the last part for URL - https://app.slack.com/client/TEAM_ID/CHANNEL_ID) which will be used in API request to upload diagram.
Update CI/CD Workflow
As we are using GitHub Actions as our CI/CD tool - following secrets should be added to the GitHub repository:
CLOUDVIZ_API_KEY- Cloudviz API key in order to authenticate diagram generation requestsSLACK_API_TOKEN- Slack API token in order to authenticate diagram upload requests
Let's update our existing deployment workflow with two additional steps (after deployment step):
- Generate live AWS diagram using Cloudviz API "Snapshot AWS Account" endpoint
- Upload diagram to Slack channel. In this example we will just upload the generated diagram image to Slack channel but it's possible to use "blocks" functionality to make rich message layouts (ex. adding text, image preview etc.).
name: Sample Deployment
on:
  pull_request:
    branches: [main]
    types:
      - "closed"

jobs:
  deployment:
    if: github.event.pull_request.merged == true
    runs-on: ubuntu-latest
    steps:
      - uses: actions/checkout@v3
        with:
          ref: ${{ github.sha }}
      - uses: actions/setup-node@v3
        with:
          node-version: "18"

      - name: Build & Deployment Steps
        run: echo "Build & Deployment Steps ...."

      # First step is to generate AWS diagram using Cloudviz API and save it as SVG file
      - name: Generate Live AWS Diagram
        env:
          AWS_REGION: 'eu-west-1'
          CLOUDVIZ_AWS_ACCOUNT_ID: '9f910f00-5c5a-11ee-b12d-57664c9998b0'
          OUTPUT_FILE: 'live-diagram.svg'
        run: |
          curl 'https://api.cloudviz.io/aws/accounts/${{ env.CLOUDVIZ_AWS_ACCOUNT_ID }}/${{ env.AWS_REGION }}/svg' \
          -H 'x-api-key: ${{ secrets.CLOUDVIZ_API_KEY}}' \
          -o ${{ env.OUTPUT_FILE }}

      # Send generated diagram to Slack channel
      - name: Send Diagram to Slack Channel
        env:
          SLACK_CHANNEL_ID: 'C05U1BKTPA9'
          OUTPUT_FILE: 'live-diagram.svg'
        run: |
          curl -F 'file=@${{ env.OUTPUT_FILE }}' \
          -F 'token=${{ secrets.SLACK_API_TOKEN}}' \
          -F 'channels=${{ env.SLACK_CHANNEL_ID }}' \
          -F 'filename=${{ env.OUTPUT_FILE }}' \
          -X POST https://slack.com/api/files.upload
Verify Updated CI/CD Workflow
Let's verify the deployment workflow and verify that the diagram was successfully generated and pushed to Slack channel. So that anyone from team can take a look and visually compare with previous deployments.
Snapshot Comparison for Deployment Changes
By analyzing JSON snapshots of your AWS account before and after deployment enables you to pinpoint and understand the precise changes introduced during the deployment process, from modified resources to updated configurations.
Simple curl request to retrieve JSON snapshot of your AWS account can be easily integrated in any CI/CD workflow:
curl 'https://api.cloudviz.io/aws/accounts/{account-id}/{region}/jsonSnapshot' \
  -H 'x-api-key: {your_api_key_here}' \
  -o jsonSnapshot.json
Once these changes are identified, you can seamlessly push diff reports to your Slack or Teams channels using existing API's (similarly like we showed scenarios with generated diagrams). This real-time sharing of deployment insights fosters agile communication and collective awareness, allowing your team to respond swiftly to any unexpected alterations.
Diagram Generation For Large AWS Accounts
For large AWS accounts data sync and diagram generation could take more than max request wait time (see Cloudviz.io API docs). In case the wait time is over the API will return 202 Accepted JSON repsonse:
{
  "state": "In Progress",
  "message": "Request is still in progress, please retry after some wait time."
}
Before you update your CI/CD pipeline best practice is that you first play with the API calls locally (ex. using Cloudviz API Postman collection) and find out if retries are needed. If the diagram generation takes more time than max API wait time then we have created a simple Bash and JavaScript examples that will automatically retry the API calls.
Bash retry example:
#!/bin/bash

# Set the API key header, output file, account id and region
header="x-api-key: your_api_key_here"
output="live-diagram.svg"
account_id="your_account_id_here"
region="eu-west-1"

# Set the API endpoint URL
url="https://api.cloudviz.io/aws/accounts/$account_id/$region/svg"


# Make the initial request
response=$(curl -s -w "%{http_code}" -H "$header" -o "$output" "$url")
retries=0

# Check if the response is 202 Accepted
while [ "$response" = "202" ]; do
  retries=$((retries+1))
  echo "Request returned 202 Accepted, retrying in 10 seconds (attempt $retries)..."
  sleep 10
  response=$(curl -s -w "%{http_code}" -H "$header" -o "$output" "$url")
done

# Check if the response is not 200 OK
if [ "$response" != "200" ]; then
  echo "Request failed with status code $response"
  exit 1
fi

echo "Request successful"
JavaScript (Node.js) retry example:
const fs = require('fs');

// Set the API key header, output file, account id and region
const headers = {
  'x-api-key': 'your_api_key_here',
};
const output = 'live-diagram.svg';
const accountId = 'your_account_id_here';
const region = 'eu-west-1';

// Set the API endpoint URL
const url = `https://api.cloudviz.io/aws/accounts/${accountId}/${region}/svg`;

try {
  let response = await fetch(url, { headers });
  let retries = 0;

  // Check if the response is 202 Accepted
  while (response.status === 202) {
    retries++;
    console.log(`Request returned 202 Accepted, retrying in 10 seconds (attempt ${retries})...`);
    await new Promise((resolve) => setTimeout(resolve, 10000));
    response = await fetch(url, { headers });
  }

  // Check if the response is not 200 OK
  if (response.status !== 200) {
    console.log(`Request failed with status code ${response.status}`);
  }

  console.log('Request successful');
  const data = await response.text();
  await fs.promises.writeFile(output, data, 'utf8');
} catch (error) {
  console.error(`Request failed with error: ${error}`);
}

As experienced AWS architects and developers, our mission is to provide users an easy way to generate stunning AWS architecture diagrams and detailed technical documentation. Join us to simplify your diagramming process and unleash the beauty of your cloud infrastructure
Support
Contact
Copyright © 2019 - 2026 Cloudviz Solutions SIA